Pineapple Tarts Update

Author: Mel // Category:
I made a new batch of shortcrust yesterday. Instead of usually working the butter into the flour with my fingers, I decided to use the mixer with the paddle attachment (the one used to make bread). It saved me time, effort, and sweat. The mixer also lifted the burden of worrying the butter melting too fast before all the ingredients could be put together. It still turned out great.

The biggest satisfaction, though came when I was making shapes with the pineapple tart mould. The pastry didn't stick and the patterns were more pronounced. Overall, the shape of each tarts were way better than my last batch. I suppose using the mixer brought this about. The dough was exposed to less heat and stayed firm. I did like all pastry chefs would do; I let the gluten rest by putting the dough into the fridge prior to shaping and baking my tarts. How did I manage to not let the pastry stick to the mould? I heavily coat the mould with flour each time before a press. I only lightly floured the surface where I was going to roll the pastry so that it would be easier to lift each shaped tarts and place them on the baking sheet. It did not change the texture of the tarts as I did not have to add more flour into the dough before rolling. So, yeay!

Tips On Making Pineapple tarts

Author: Mel // Category: ,
It's been quite a while since I posted anything, ever since dear Ain kindly took to task of "decorating" my blog (thank you darling, muahs!). I had been busy being obsessed with making fine pineapple tarts ever (:p) and taking care of a very demanding 8 month old little munchkin to have enough enthusiasm in paying attention to this blog. Also, honestly in the beginning my intentions were to share with the world recipes I knew, until someone asked for my lasagne recipe that I hesitated and became reluctant. Okay, I admit. Sometimes it's not easy giving away prized recipes. Well, hell! All this while I've been cursing secretive recipe holders and now its come back full circle biting me in the bu..... ehem... my behind.


Anyway, I had a grand time making the tarts with all kinds of recipes and alterations.Everytime I thought I finally had the recipe, it failed or wasn't just good enough to my mum's discerning taste. I even got a recipe from my Aunt coz she makes the most delicious tarts and even that did not work for me, though I passed with flying colors with her jam recipe. That, I am thankful for.
In the end, my mother told me to create my own recipe and trust that it would be great. I thought I couldn't do it as I have always thought myself to be a good copier, not a creator until I just went ahead and hantam sajalaahh labuuu! I surprised myself when I managed to do it. I had to read alot about pastry, committing time researching the net and with alot of trial and error I have come to a recipe I am satisfied with. Only set back is that because my pastry is high in butter content and with the hot and humid weather it gets soft real fast after coming out of the chiller. It's fine and dandy if it was a base for a pie - just quickly roll out the pastry dough, place it on a pie dish and blind bake. Not so for making tarts because time is needed to shape the pastry using a cookie cutter or special pineapple tart mould. The pastry tends to stick to the mold when it starts to get soft. Even dusting the mould with flour just does not make a perfect shape. So, for now I just roll out small pieces of dough at a time, leaving the rest in the chiller and contend with not so perfectly shaped tarts. Atleast the taste is there. I could go for a beautiful looking tart but I would have to decrease the amount of butter and sacrifice taste which I am not willing to do. Another thing is that if I tend to dust too much flour on the dough and the mould, it tends to change the texture of the tart, leaving a floury taste on the baked goods. I will need more practice in shaping techniques.
There are hundreds of pineapple tart recipes to be found in the net. Here are a few guidelines I have listed below to follow when choosing a particular recipe you like and in the process of making and baking so that your chances of failure is greatly diminished.
  • For tasty tarts, choose a recipe where the ratio of butter is more than half of the flour. The standard recipe for shortcrust is usually half amount of butter to flour. E.g 250 gms butter and 500 gms flour. Increase amount of butter.Butter is the one that produces melt in the mouth pastry.
  • Use all purpose flour. FYI plain flour is all purpose flour. Pastry flour is good too. If it is not available you can "make" your own pastry flour by using 3 parts plain flour and 1 part cake flour of the total amount of flour stated in recipe. E.g, amount of flour is 400 gms in recipe. So, weigh 300 gms plain flour and 100 gms cake flour and walla!
  • Choose a recipe that uses either egg whites or egg yolks, not a combination when making cookies, that is. For tarts, choose egg yolks only. Egg yolks not only tenderize the tart but also makes it crispy. Egg whites tend to make the tart puff up in the oven and you end up with a dry, cake like pastry. If you still insist on using whole eggs,replace some of it with milk to have a more crispy tart.
  • No need to use oil. Like any fat it does tenderize the dough but in my experience, even though it makes a melt in the mouth pastry but when you take a bite into the tart, it leaves some sort of left over sticky flour tasting dough you end up having to clean your gums and teeth with your tongue.Egg whites tend to produce this kind of texture as well.
  • Know your oven well. It is recommended that you buy an oven thermometer to get the right oven temp.
  • http://www.malaysiabest.net/ has great tips on making good cookies that can also be applied to making tarts.
  • For crispier tarts, bake them longer than what is stated in the recipe and immediately transfer to wire rack to cool completely. Other than that, make it with all butter.
  • For the tarts to stay crispy only use air tight containers - this applies to hot and humid weather only. Abstain from using brown sugar because it is one of the ingredients that hold moisture. White granulated sugar or icing sugar is preferred.
  • This is another tip I found from baking 101 online. If you find that your tarts are starting to soften after a few days, rebake in a 300 degrees farenheit oven for 3-5 minutes. That will re-crisp the tarts.
  • You are looking for tender, crisp, crumbly and melts in the mouth pineapple tarts

All else failing or you neither have the time nor the interest to bake your own pineapple tarts, you can always drop a line and order from me. Leave your contact number and I will get back to you as soon as I can :)

The Recipe Book I promised to upload and then some

Author: Mel // Category:


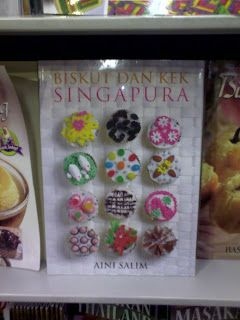
This is the Singaporean Cookbook by Aini Salim and like I said in my earlier post, the spice mix recipe (rempah kuih) is included in here.

Also, there are two more books of the Famous Lapis Sarawak maker, Rabiah Amit, FYI.


Vienna Vegetable Soup

Author: Mel // Category:
Whenever I make this soup it reminds me of a jovial lady I met through my colleague when I was in Vienna in my early 20's. She was a Malaysian married to an Austrian chap with two lovely children. She was kind enough to entertain my colleague and I by cooking delicious Austrian meals I never forgot.

I remember one of the days we visited with her.There was this wonderful aroma coming from her kitchen as she opened the door and led us into her home. After exchanging a few words she went about setting the table and sliced some home made french loaf. Then she dished out a big bowl of this vegetable soup and invited us to eat, very much of a hospitable Malay lady she was.

Apalagi(What else), I dived into the soup and thought of nothing else but my own enjoyment of a fine dish, thinking to myself how perfect it was slurping soup in the middle of winter. I unabashedly asked for the recipe and to my surprise it was/is a very simple dish to make. The vegetables only consist of potatoes, carrots, mushrooms and celery but it is SOOOO tasty. I am not much of a celery person, especially eating the vegetable on its own. I guess the wonderment of celery is that it has a strong flavour that when cooked with other vegetables, it makes the whole thing so good and contributes beautifully to the aroma of the finished dish. This truth was further stamped when I recently watched Nigella on AFC. She was making this particular stew and she said to trust her and add chunks of celery into the dish she was preparing. She stressed that no other vegetable can substitute it because it just wouldn't work. I instantly knew what she meant. Yes, I believe you, Nigella!

I really do not know the real name of this dish or whether it was created by this wonderful lady with sweet hands. So I just called it Vienna Vegetable Soup when anybody enquired about it. Well, I don't mean to brag but EVERYBODY always enquires about this soup after tasting it. Even my father's Mat Salleh(white man) friend from Scotland asked for this recipe.

Ingredients:-
  • 2 small to medium sized potatoes - diced
  • 1 stalk celery - sliced
  • 1/2 packet of shiitake mushrooms - sliced
  • 1 carrot - diced
  • 1 and 1/2 big yellow onions - diced
  • 100-140 gms sour cream - actually how much sour cream depends on individual taste
  • 1 l vegetable stock / chicken stock - total amount of stock already mixed with water. But really just go by eye how much liquid you want to add.
  • 1 tsp marjoram( If using fresh herb the amount again, depends on taste. I tend to use up the whole packet I purchase in Jaya Grocer. The dried herb is preferable because the aroma and flavor is different and more distinct than the fresh ones).
Method:-
  1. Fry onions till soft and translucent.
  2. Add mushrooms and fry till the mushroom smell goes off.
  3. Add carrots and potatoes and fry till half cooked.
  4. Add celery and fry till fragrant.
  5. Pour stock in. Let simmer.
  6. Once the broth starts to boil, pour in sour cream as much as you like until the soup turns white in colour.Keep stirring while pouring in the cream or it will curdle.
  7. Once vegetables are cooked, rub dried marjoram between palms and throw in the pot.Season with salt.
  8. Turn off fire.
  9. Serve.

Tips in Making Kek Lapis/Thousand Layer Cake/Spekkoek Lapis Legit

Author: Mel // Category:
From what I've gathered so far about this luscious cake is that some recipes use egg yolks or egg whites only, some use whole eggs and others use yolks and part whites. It is important to know the basics of baking especially when you are thinking of making adjustments in a particular recipe.You will also be able to tell right of the bat whether a given recipe will work or not just by looking at the listed amount of each ingredient.

The ingredients used are usually divided into 2 categories that will affect the cake batter; tougheners and tenderisers.Flour, whole eggs, egg whites, water and milk are tougheners. Products that tenderises the cake are sugar, fat(butter, margarine,etc),egg yolk and acid. Basically if you want to decrease the amount of an ingredient in one category, you will have to increase the amount of one ingredient in the other category. For example, if you want to decrease the amount of butter (tenderiser) in your recipe, you will have to add on to one of the tougheners in your recipe. You can't add flour or egg white because that would make your cake drier. So, the best choice is adding another whole egg to balance back the cake. So, choose wisely, when you are making adjustments, okay?!

Anyway, back to the topic at hand, i.e tips in making the Lapis Cake:-

1) Use an oven with a top and bottom grill function.

2) If you have a small oven, you can close the oven lid/door during grilling.

3) If you have a big oven, then it is best to leave the door open. Closing the oven door will cause the top layer to burn or over cook while the inside remain uncooked.

4) Some recipes tell you to lightly butter each layer to make the cake more moist. Use your own judgement whether to implement this step. The cake I made did not require me to do this.

5) You have to know your oven well. Some ovens need a slightly lower or higher temperature than in the stated recipe to bake well. As a rule of thumb when baking any cakes, always check the cake atleast 15 minutes before it's done. Example; if the recipe says bake for an hour, check it after 45 minutes.

6) For my oven, I did not turn the bottom grill on. I used the top grill throughout. I did not even turn the bottom grill on at the last layer because all my layers were cooked well. Once, I tried baking the overall cake after finishing all the layers. Lo and behold, the sides and bottom went dry and burnt! One way to know whether your cake is cooked, is to separate the cake from the pan by running a knife through the sides. If the knife comes out clean, you are safe. If there is wet batter sticking to the knife, then cover the top of the cake with foil and bake the cake again for another 10 to 15 minutes, using top and bottom heat.

7) To avoid your layers from being uncooked, when grilling the first layer and building up to the middle of the pan, place the pan in the middle rung. After that or once you have finished atleast two thirds of the batter, place the pan at the bottom rung and continue grilling till you finish.

8) A good Lapis cake has atleast 12 layers and more, yah!

9) In my opinion, a good Lapis also has alot of eggs, whether you like it or not. I would go for a recipe having atleast 20 eggs (Hey, I am not a doctor. I am a baker). An exception is when I am having a go at a Lapis Sarawak cake. Some of the recipes only needs 10 eggs BUT because it has Sekaya(egg jam) added to make the cake moist and delish.

10) If you are wondering how long to grill each layer, it is until the top is nicely browned. Some ovens take 4 or 5 or even 7 minutes each time.So time yourself and see how long each layer of your cake takes to grill.

11) You can't use a normal oven setting. Only grill function because unlike other cakes you need to bake each layer till the top is brown and keep on adding layers on top of each other so you have beautiful lines once your cake is done.The top grill function will cook your top most layer without affecting the already cooked layers underneath.Alot of work. That's why it is not so cheap to buy.

12) Mixing the ingredients properly is most important. The butter, condensed milk, flavoring and cheese(if you're adding cheese in your lapis) must be beaten until it is fluffy and light in color.

13) The egg yolks, sugar and emulsifier must be beaten till it is thick and light in colour. One way to know is to lift the beater and the batter is thick and slow to fall back into the mixing bowl.If you want a good tasting cake, please take note of step 12, 13 and below.

14) Add flavouring into your butter instead of the eggs. Flavourings such as vanilla extract/ essence or brandy. This is another added ooomph to your Lapis.This step is similar to making a sugee cake.

Kalau ada masalah dengan bahasa Inggeris, bagi tau saya akan "translate"kan...

Home Made Mixed Spice/Rempah Kuih

Author: Mel // Category:
I have been searching the net and even cookbooks but finding a recipe for home made mixed spice seemed to elude me til recently. I've got 2 recipes actually. One from my MIL (mother in law, God bless her soul) and another one when I was browsing through Popular bookstore at Ikano Power Center. I came across it in a Singaporean cookbook. I did not take note of the author's name but I will go there again and take the picture of the cover and upload it here soon, just in case anyone is interested.

I shall not publish her recipe here for I don't want to infringe into any copyright rules unless I take the time to write her and ask for permission. It's best that if you are interested, to get the cookbook yourself. I know, I know. You don't know the title of the book. I will let you know later.

What I will tell you here, however, is that the author uses star anise,nutmeg and ALOT of cardamom.

Please do not be disheartened dear readers. I shall give you my MIL's recipe. It's lovely and the taste is not as strong as a store bought mix. I really dislike the one from Bake with Yen, though my Mom seems to like it. It depends, you know. If you love the taste of strong spices, then by all means get it for yourself. If you are like me, who prefers a fragrant and not so empowering taste of spices in the Lapis cake, then make this one. I figure, everyone will be able to eat your cake.

Happy Life Loving Peeps

Author: Mel // Category: